Category: How To

Fix for Windows Search Service Startup Error 1053 in Windows 7 0

Fix for Windows Search Service Startup Error 1053 in Windows 7

Recently I came across a problem in a Windows 7 PC where the Windows Search service failed to start, and manually starting the service using Services MMC resulted in Error 1053, with the following error message verbatim. Windows could not start the Windows Search service on Local Computer. Error 1053: The service did not respond to the start or control request in a timely fashion. And the following entry is recorded in the event viewer. Log Name: System Source: Service Control Manager Date: Event ID: 7009 Task Category: None Level: Error Keywords: Classic User: N/A Computer: Description: A timeout was reached (30000 milliseconds) while waiting for the Windows Search service to connect. Because the Windows Search service failed to start, the Indexing doesn’t run, and the controls in Indexing Options are dimmed out. Note that the Windows Search (WSearch) service is set to start automatically (delayed start) by default in Windows 7. Registry Fix To resolve the problem, download wsearch-1053-fix.zip, unzip and apply the wsearch-1053-fix.reg file (This fix is for Windows 7 PCs only.) After applying, open Services MMC (Services.msc), right-click Windows Search and click Start. Reference: http://www.winhelponline.com/blog/fix-windows-search-service-error-1053-windows-7/

How to change vCenter URL in VMware View 0

How to change vCenter URL in VMware View

In some cases VMware View may show a problem with the certificate on the vCenter Server, displaying a dashboard red flag even when certificates and properly in place. This behavior can happen because the administrator entered the vCenter Server address in VMware View Admin UI using the short name instead of the FQDN, but the certificate used on the vCenter Server is a wildcard certificate for the domain. It’s not possible to modify the vCenter Server URL/Name via  Admin UI without removing and re-adding the vCenter instance into VMware View. The problem in doing this operation is that desktop pool configurations will be lost and no new desktops is provisioned or deleted untill desktop pools are re-configured. However, there is an easier way to modify the vCenter URL, via the ADAM database.  You will need to launch ADSI (adsiedit.msc) in one of the View Connection Servers and modify the attribute pae-VCURL in CN=<VCGUID>,OU=VirtualCenter,OU=Properties,DC=vdi,dc=vmware,dc=int. This attribute is where the vCenter URL entry is stored. That should be all that’s needed, the View broker will pick up the changes and reconnect to vCenter Server without requiring additional steps.   Reference: http://myvirtualcloud.net/?p=4075

VMware View Pool Entitelement Cleanup 0

VMware View Pool Entitelement Cleanup

When you unassign a VM from a user in VMware View pool, the user name not be deleted from “Pool Entitlement”, If you checked “Enable Auto Assignment” in you pool settings and the user send a request to the pool, View will assign a new VM (Mostly spare VM) to the user, this is a misconfiguration. You can delete users which don’t have VM on the pool for the pool entitlement by this script: # By Davoud Teimouri v0.1 CLS #Clear screen Write-Host(“This script will clean your pool from unassigned users”) $PoolID=Read-Host (“Please enter PoolID”) #Get PoolID from the user (Sometimes PoolID is same as pool name $Users=Get-PoolEntitlement -pool_id $PoolID | Select-Object displayname #Query pool’s users and store them to $Users Foreach ($User in $USers) { $User=$User.displayname $RUser=$User.Substring(15) #Change this based on your domain name Write-Host (“Proccessing on: ” + $RUser) -foregroundcolor “Green” Write-Host $VM=Get-DesktopVM -pool_id $PoolID | Select-Object user_displayname | Where-Object {$_.user_displayname -eq $User} If ($VM -eq $Null) { Get-User -name $RUser | Where-Object {$_.displayname -eq $user} |Remove-PoolEntitlement -pool_id $PoolID | Out-Null Write-Host ($User + ” has been removed from ” + $PoolID) -foregroundcolor “Red” Write-Host } } This script should run on View server directly. [quotes_and_tips]

Using Client Information in VMware View 0

Using Client Information in VMware View

The VMware View Client delivers useful information to the VMware View Agent which can be found in the virtual desktops Windows registry. This information can be used by scripts i.e. for mapping the right network printer based on the location of the View Client device. The information is stored as environment variables within the registry key: HKEY_CURRENT_USER\Volatile Environment. This list shows which variables are available: ViewClient_Broker_DNS_Name (FDQN of the broker) ViewClient_Broker_Remote_IP_Address ViewClient_Broker_Tunnel_URL ViewClient_Broker_Tunneled (True/False) ViewClient_Broker_URL ViewClient_IP_Address (IP address of the connecting device) ViewClient_LoggedOn_Domainname (Domainname) ViewClient_LoggedOn_Username (Username) ViewClient_MAC_Address (Client MAC address) ViewClient_Machine_Name (Client hostname) ViewClient_Type (Linux/Windows) You can read this information very easily from the registry using a VB-script: Example: Based on the client’s hostname, IP-address or MAC address it would be possible to map a special printer or network drive during logon or reconnect. Companies using hot desks for their employees or just people moving between different workplaces during the day can take advance of that. The script can grab the client name variable, then check it against a database and retrieve the correct network printer for that location. That’s it! Reference: http://www.thatsmyview.net/2009/05/29/using-client-information-in-vmware-view/ [quotes_and_tips]

Gpresult 0

Gpresult

Displays the Resultant Set of Policy (RSoP) information for a remote user and computer. For examples of how this command can be used. Syntax   gpresult [/s <COMPUTER> [/u <USERNAME> [/p [<PASSWORD>]]]] [/user [<TARGETDOMAIN>\]<TARGETUSER>] [/scope {user | computer}] {/r | /v | /z | [/x | /h] <FILENAME> [/f] | /?} Parameters Note Except when you use /?, you must include an output option, either /r, /v, /z, /x, or /h.    Parameter Description /s <COMPUTER> Specifies the name or IP address of a remote computer. Do not use backslashes. The default is the local computer. /u <USERNAME> Uses the credentials of the specified user to run the command. The default user is the user who is logged on to the computer that issues the command. /p [<PASSWORD>] Specifies the password of the user account that is provided in the /u parameter. If /p is omitted, gpresult prompts for the password. /pcannot be used with /x or /h. /user [<TARGETDOMAIN>\]<TARGETUSER> Specifies the remote user whose RSoP data is to be displayed. /scope {user | computer} Displays RSoP data for either the user or the computer. If /scope is omitted, gpresult displays RSoP data for both the user and the computer. [/x | /h] <FILENAME> Saves the report in either XML (/x) or HTML (/h) format at the location and with...

Cleanup Windows Driver Store Folder 0

Cleanup Windows Driver Store Folder

When we installed a new hardware or upgraded a driver, driver packages will be added to “%SystemRoot%System32\DriverStore”, After few time Driver Store folder size will grow and maybe it’s increased to above 2 GB or more, for cleaning and removing unneeded drivers, you can download “DriverStore Explorer” from this address: http://driverstoreexplorer.codeplex.com/ [quotes_and_tips] 

pcoip smartcard 2 0

Using smart cards on zero client under PCoIP protocol

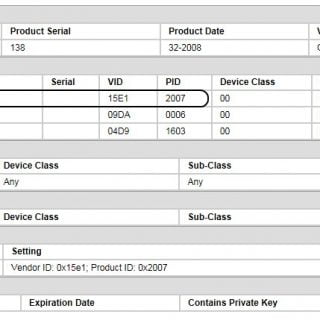
A smart card, chip card, or integrated circuit card (ICC), is any pocket-sized card with embedded integrated circuits. A smart card ormicroprocessor cards contain volatile memory and microprocessor components. The card is made of plastic, generally polyvinyl chloride, but sometimes acrylonitrile butadiene styrene or polycarbonate. Smart cards may also provide strong security authentication for single sign-on (SSO) within large organizations. Smart cards supported by PCoIP but we need to configure somethings on virtual machines and PCoIP management console and then you can use it same as a USB drive. Also this feature supported by VMware, I’ve tested that on vSphere 5 platform. You must access to PCoIP MC, zero clients web access page and modify installed VMware view agent features. If you need to use smart card within virtual machine, you should remove PCoIP smart card feature from View Agent. After install VMware View Agent on your virtual machine, plug your security device to zero client and then logon on to MC. Select your device in discovery devices list and open view details page. If your security device detected by zero client, you can find that on “USB Devices”. You need to VID and PID values for insert to a new profile. Close view details page and go to “Profile” tab, you must create a new...

install android x86 v4 0 rc1 on 0

Install Android-x86 v4.0 RC1 on Oracle VirtualBox

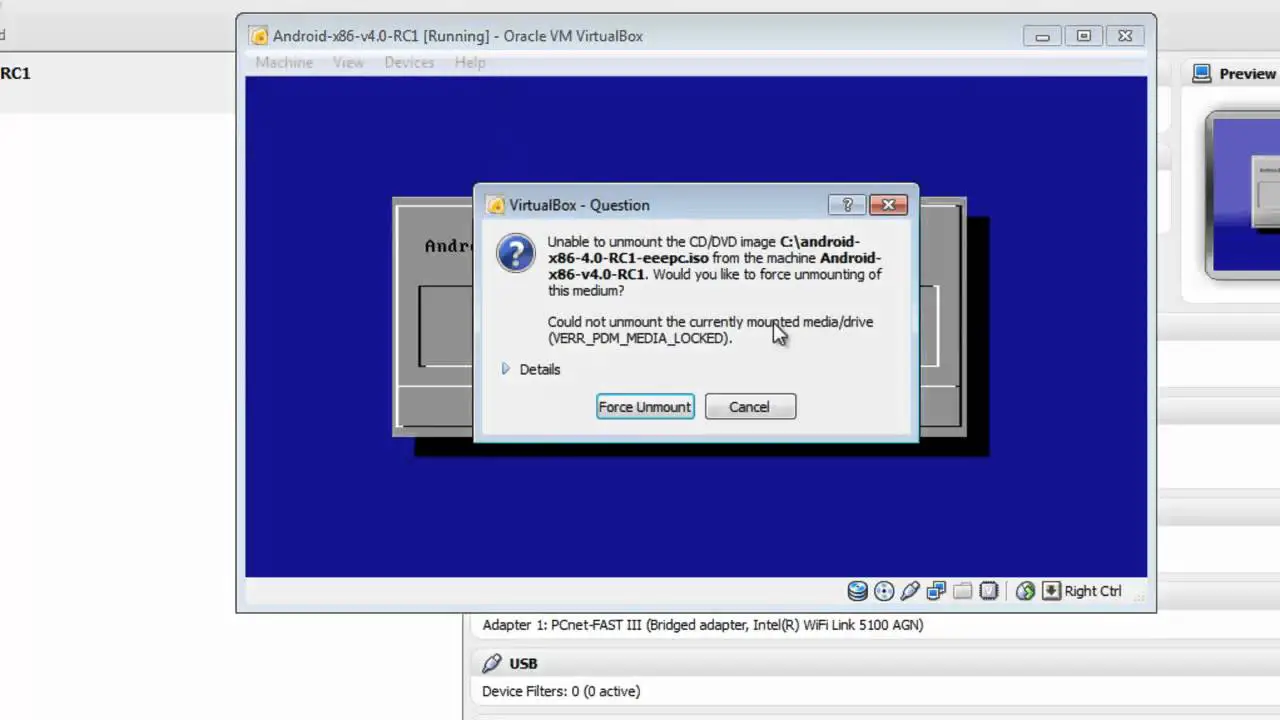
Android-x86 is a Linux-based operating system for mobile devices such as smartphones and tablet computers. It is developed by the Open Handset Alliance led by Google. Android supports ARM,MIPS and x86 platforms. Because Android has been developed on x86 platform, we can install it on some virtualization software as a virtual machine such as VMware Workstation, Oracle VirtualBox, QEMU and etc. In this post we will install Android x86 v4.0 RC1 (Latest version) on Oracle VirtualBox, we need to a source so please download it from this link: http://code.google.com/p/android-x86/downloads/list Please download android-x86-4.0-RC1-eeepc.iso, because we can have network connectivity just on this. After download completed, run your VirtualBox and if you don’t have it, you can download it form this link: https://www.virtualbox.org/wiki/Downloads Android-x86 Installation Steps 1. Click on New in VirtualBox for create a new virtual machine. 2. Enter your VM name and select OS type, you must select “Linux” for operating system and “Other Linux” for version. 3. Android need to 256 MB memory but 512 MB is recommended. 4. We need a medium for saving Android files on that, so like other virtual machines, we add a hard disk to it. 5. Select VHD hard disk type, I will explain about...

Setup lab for VMware vSphere 5 – Part 2 (Installing ESXi 5) 0

Setup lab for VMware vSphere 5 – Part 2 (Installing ESXi 5)

As we saw on the previous post, we need to install ESXi 5 on both types of lab (Virtual or Physical) so  we need to installation source. You must create an account on www.vmware.com and then you can download it. After download iso file, burn it on a CD. Before we start installation, we must check which do we have minimum hardware or our hardware are compatible with ESXi 5 or not?   Minimum system requirement: 64bit processor with minimum two cores ( Supports only LAHF and SAHF CPU instructions) 2GB RAM 900 MB free space on storage device (local storage or remote storage) Enable Intel-VT or AMD-V in BIOS, if you want to install ESXi on a virtual machine, for VMware Workstation 7.x you must select Linux (2.6) 64-bit for OS type or ESXi 4, ESXi 5 is defined in VMware Workstation 8.x. Oracle Virtual Box 4.x is same as Workstation 7.x . Boot your machine by ESXi 5 disk, you will see boot menu, for start installation press Enter. ESXi installer beings to load modules on RAM.      In next step welcome screen will shown.   For accept license agreement press F11 and continue installation process.     Installer search your available...

Setup lab for VMware vSphere 5 – Part 1 0

Setup lab for VMware vSphere 5 – Part 1

Lab, it’s very important part of a training, because until you haven’t test your scenario on a lab you can’t see results, problems and you can’t find solutions. I believe experiences are result of tests, problems and again tests. We have two choices for testing VMware vSphere 5 environment:  Virtual lab Physical lab Virtual lab: We can understand from this title which this lab must make on virtualization environment, so we can use VMware Workstation on Windows or VMware Fusion on Mac. We need to powerful hardware for making this lab, we need to 64bit Intel CPU with Intel VT technology or 64 bit AMD CPU with AMD-V technology, if your CPU isn’t Virtual Technology-capable, you may can’t power on 64bit virtual machines. VMware Workstation and VMware Fusion can run ESX/ESXi as a virtual machine and then we can deploy and run virtual machines on this VM and also for storage we can use Openfiler or FreeNAS as a virtual machine.       If you want to test advanced features, may you have one or limitations:   Minimum RAM: 4 GB Fault Tolerance (FT) won’t work. Performance may suffer. Physical lab: This type of lab will setup on physical platforms such as desktops, servers...