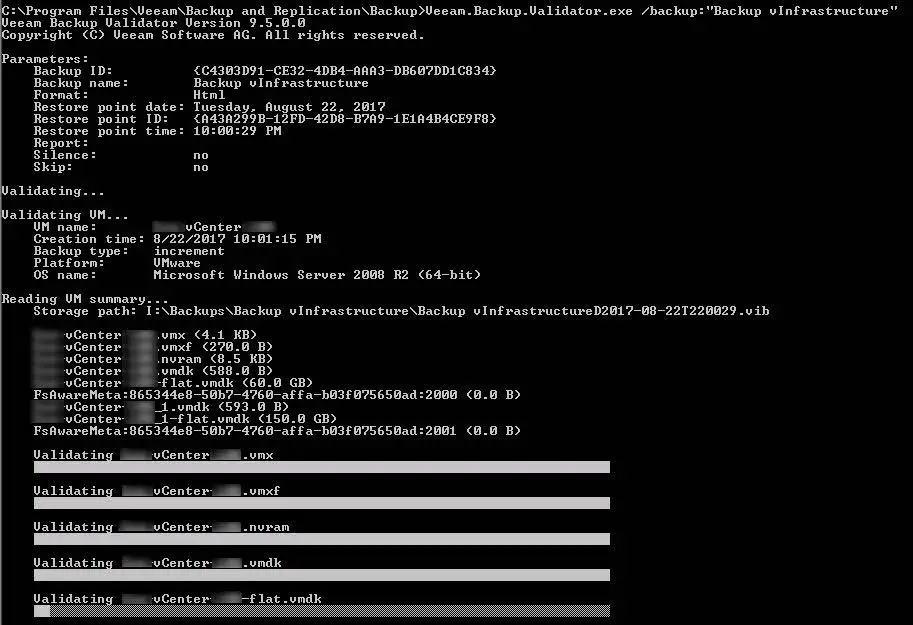
Veeam BR Validator Command-Line Tool: Essential Tool for Validating Veeam Backups
Veeam BR provides an internal tool for checking backup health offline. Backup is a way to keep data safer in any environment but no one can guarantee that the backup file is healthy because there is some reason that backup file can be corrupted during backup or after backup such as storage failure or during backup copy on an external medium. As the backup file health is very important and sometimes administrators have to restore virtual machines after accidentally deletion.
Without removing VM data, that is a tool that checks the integrity of backup files. A backup is tested at the file level by the command-prompt CRC check programme Veeam Backup Validator. If backup data were transmitted over a network or if hardware issues happened in a backup storage area, you might need to use this application to determine whether they were damaged.
The tool use the checksum method for integrity validation. Every data block in the backup file is given a checksum, which Veeam Backup & Replication adds to the data blocks when it creates a backup of a virtual machine. Data block checksums are recalculated by Veeam Backup Validator, and they are compared to the original checksum values. The backup file is functional if the findings are same.
I hope, no one face with the below error and lose their backup files:
All instances of storage metadata are corrupt
Because there is no way to restore the backup file. Read this post to find how administrators can prevent such issues.
Where Is The Veeam BR Validator Command-Line Tool?
The tool can be found in the installation folder for Backup & Replication.
- Default Install Path: C:\Program Files\Veeam\Backup and Replication\Backup\Veeam.Backup.Validator.exe
- If the path was changed on install, you can find the path in the registry: [HKEY_LOCAL_MACHINE\SOFTWARE\Veeam\Veeam Backup and Replication] CorePath
Command-Line – Syntax
Note: Some command line options shown below are only available in v8 and v9. Previous versions had reduced functionality.
/backup:backupname|backupid [/vmname:vmname]
[/point:pointid] [/date:pointdate] [/time:pointtime] [/silence]
[/skip] [/report:reportpath [/format:xml|html]]
/file:backupfile{1..*} [/vmname:vmname] [/silence] [/skip]
[/report:reportpath [/format:xml|html]]
Command-Line – Parameters
/? – Displays help
/backup – Specifies backup name or backup ID
/vmname – Specifies one or more VM names (empty value for all VMs)
/point – Specifies restore point ID
/date – Specifies restore point date
/time – Specifies restore point time
/silence – Enables silence output mode
/skip – Skips specified VMs
/report – Generates HTML report at the specified path
/file – Specifies one or more backup files (VBM, VBK, VIB, VLB)
/format – Specified report format (HTML, XML)
Command-Line – Examples
Here is some example for validating backup files:
- Validate the VMs named “W2008”, “W2008R2_DC” and “W2K” in the most recent restore point for the backup “Backup Job 1_imported”.
/backup:”Backup Job 1_imported” /vmname:W2008 /vmname:W2008R2_DC /vmname:W2K
- Validate all virtual machines in the last restore point with ID 3942788C-B309-4FA4-A111-A4C87B3EC63D.
/backup:3942788C-B309-4FA4-A111-A4C87B3EC63D
- Validate a VM with the name “Windows 8″ in the restore point created on December 5 2012 for a job named “Backup Job 1”.
/backup:”Backup Job 1″ /vmname:”Windows 8″ /date:05.12.2012
- Validate a VM with the name “VM1” in the restore point created around 16:00 on December 5 2012 for a job named “Backup Job 2”.
/backup:”Backup Job 2″ /vmname:”VM1″ /date:”05.12.2012″ /time “16:00”
- Validate a VM with the name “VM2” contained in the VBM file located at C:\Backup\VM2_Backup.vbm
/file:”C:\Backup\VM2_Backup.vbm” /vmname:”VM2″
- Validate all VMs in VBK-file (backup file).
/file:”C:\Backup\VM2_Backup.vbk”
- Validate a VM with the name “VM3” in the most recent restore point of “Backup Job 1” and create an HTML-report.
/backup:”Backup Job 1″ /vmname:”VM3″ /report:”D:\Reports\Backup_Job_1_Validate_30_09_2014.html”
- Validate a VM with the name “VM3” in the most recent restore point of “Backup Job 1” and create XML-report.
/backup:”Backup Job 1″ /vmname:”VM3″ /report:”D:\Reports\Backup_Job_1_Validate_30_09_2014.xml” /format:xml
Further Reading
Event Driven Automation: Unleashing the Power of Agility and Efficiency
Proxmox Backup Server: #1 Comprehensive and Cost-Effective Data Protection
Veeam Backup and Replication – How to Choose Best Transport Mode for vSphere Proxy?
HPE OneView Global Dashboard: Best Software for Global Monitoring


